Selecting Successful Seatrout Flies

Selecting Successful Seatrout Flies

selecting successful seatrout flies

“What has been will be again, what has been done will be done again; there is nothing new under the sun.” -Ecclesiastes 1.9

More fishermen fish for seatrout than any other inshore gamefish along the coasts of the southeastern United States. You would think that reams of information would be available on selecting successful seatrout flies. Not so.

Here in Florida the average seatrout weighs between one and three pounds, so they’re not very big. They’re fairly easy to catch most of the time. They don’t fight very hard. And they’re usually hard to sight fish. So most serious fly fishers look for other species.

Challenging Targets

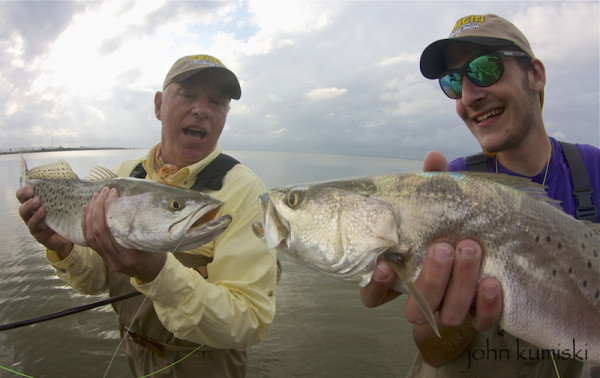
A seatrout over five or six pounds is a difficult fish to fool. They can be sight fished, best during the winter but also while they’re spawning. They are as spooky as any creature with fins. A seatrout over five pounds that is sight fished and caught on a fly rod is a great trophy.

The smaller ones are fun and will save the day when more appealing species aren’t biting. The larger ones present a formidable target in their own right.

Eyes Bigger Than Stomach?

A seatrout of any size is a glutton. A big seatrout will take a very large bait.

While poling one time I spotted what I thought was a dead fish lying on the bottom. I went over to investigate and was heartbroken to see it was quite a large seatrout, belly up. I poked it gently with the push pole and was surprised to see it wiggle weakly. I said to my fisherman, “It’s not dead! Reach down and pick it up.” He did, and we put it on a Boga Grip. It weighed a whopping nine pounds. Not many fly casters can say they’ve caught a nine pound seatrout with their bare hands!

I started examining the fish. It was pretty beat up. I looked down into its mouth. There was the tail of a one to two pound mullet sticking out of the fish’s throat. If a big seatrout will take a mullet this size they’ll also take a large fly.

Smaller seatrout seem to prefer shrimp. While larger fish will certainly eat them, they usually fill up by eating baitfish, principally by ambush feeding. Mullet, menhaden, pigfish, pinfish, pilchards, etc., all help big seatrout stay fat and healthy. So your best bet with seatrout flies, if you prefer the larger fish, is to stick with baitfish patterns.
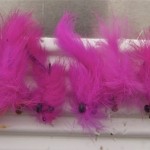
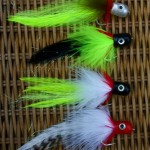
Color, Flash, Sound

Bright colors and flash seem to attract the eye of big trout. Red and yellow, red and white, chartreuse and white, all seem to work well. Fluorescent and even luminescent colors are frequently outstanding. But I’ve also had good success with realistic color combinations, and drab colors like black, gray, brown, and grizzly, especially when sight fishing for them.

You can find trout in various depths of water. For shallow water fish (about fifteen inches deep or less), and these are almost always big ones, you need a fly that kisses the water when it touches down. The small “Plop!” of a lead eye spooks them badly in this situation.

For fish in deeper water, noise seems to be a great attractor. Flies that incorporate rattles can be extremely effective. Those luminescent materials can greatly add to the effectiveness of deep water patterns, too.

To read the rest of this article, visit this link…

John Kumiski
http://www.spottedtail.com

All content in this blog, including writing and photos, copyright John Kumiski 2013. All rights are reserved.

Share |


Redfish- Presenting the Fly

This is an excerpt from the book, Redfish on the Fly, by Capt. John Kumiski 

Redfish- Presenting the Fly

Redfish- Presenting the Fly
It was a redfish fisher’s dream, a school of at least 500 fish, swimming fast, up on top, crashing bait all around us, one of the finest sights in all of angling, and one that one doesn’t see very often in the Mosquito Lagoon. Rob Ricks was trembling with excitement. He had caught exactly one redfish on fly in his life, and badly wanted another. It was practically certain that the deed would now be done.

“Cast out in front of them, and just make it look alive,” I told him. Rob was a weak caster. When he got the fly in the water, not very far away, there was so much slack in the line that the cast was useless.

“Try it again,” I said. “Lead them, put it where they’re going and let them swim into it.” Rob tried again with the same result. And again, and again, and again. Finally the fish disappeared. We’d caught exactly none.

The moral to this story? Your casting must be second nature in order to take advantage of opportunities, especially once in a lifetime opportunities like this one was. But it’s a great segue into this section’s premise- after locating the fish, how you present the fly to them is the single most important variable in getting one to bite, much more important than what’s at the end of your leader.

The Strike Zone
When I was younger and just getting into saltwater fly fishing, I was fortunate to get a copy of the finest instructional fishing video ever made, the late Billy Pate’s Fly Fishing for Tarpon (which I recommend highly). In this video Billy explains the concept of strike zones as it relates to tarpon fishing. We’re going to revisit this concept and then relate it to presenting the fly to redfish- cruising fish, laid-up fish, and tailers.

The strike zone is an area around the fish where, if the fly is properly presented, you have a reasonable chance that the fish will take it. This area is roughly shaped like a half a football, extending with the wide part at the mouth of the fish to the apex out in front of it. Since their mouths point down, redfish prefer to feed down, but they show little hesitation in coming up for a fly unless they are heavily fished or have been disturbed by boat traffic.

Understand that the strike zone changes in size constantly though, going from non-existent to huge and back again, and occasionally even goes behind the fish. Over the years I’ve seen a few fish do about faces to take a fly. It’s rare, but it does happen. Our assumption here is that in order to get a bite, the fly must be in the strike zone.

Hopefully it’s obvious that the longer the fly is in that strike zone, the more likely the fish is to take it. This brings us to presentation angles.

Read the rest of the article here, or  buy the book!

John Kumiski
http://www.spottedtail.com

All content in this blog, including writing and photos, copyright John Kumiski 2013. All rights are reserved.

Flies for Goodnews River King Salmon

Flies for King Salmon

This is the first in a series about flies used on the Goodnews River, Alaska.

Goodnews River king salmon typically rest in seam water that’s six to eight feet deep. There’s always a strong current. If you want to catch one with a fly rod you usually need a fast sinking fly line and a fast sinking fly.

Before my first trip there Bob Stearns allayed my fears about what to tie by telling me, “Those fish have never seen a fly before, never seen a fisherman. They will eat almost any well-presented fly.” Of course he was right. Most of the time the fish are way less fussy than the fisherman, and a heavy Clouser Minnow will often work as well as anything else.

That having been said, the old standard fly was a cerise-colored bunny leech tied on a size two Mustad 36890 hook, with a 1/30th ounce or heavier lead eye.

Bunny Leeches

Pink (cerise, actually) bunny leeches ready for deployment.

KingSalmonBunnyLeech

This hen king salmon took one of those simple bunny leeches.

Articulated flies (see how to tie one here) have become all the rage since I started working at the Goodnews River Lodge six seasons back. They take longer to tie but help prevent short strikes. You can tie big, crazy flies this way. For weight some tyers use lead eyes, others use tungsten cone-shaped beads. Both work, so use whichever you prefer.

ArticulatedFly-KingSalmon

This articulated fly, tied with both rabbit and Arctic fox zonker strips, was eaten by a king salmon.

On the Goodnews only single hook artificials are allowed, so you must break off the bend and point of the forward hook. Use an inexpensive iron for this work (I use a 2/0 Mustad 3407). Alternatively, purchase a special hookless hook made specifically for tying articulated flies.

Most guides at Goodnews like an octopus-style hook for the trailer, with sizes ranging from 4 to 1/0, the tyer’s personal choice. A larger hook is less likely to fail under duress. Some of us dress it, others leave it naked, again, a matter of preference.

KingSalmonArticulatedFly

Another king salmon falls for an articulated fly.

Effective colors include cerise, purple, hot pink, black, blue, orange, chartreuse, and combinations of these. Flash material is in good taste, and a rattle is easily tied in on the forward hook before tying in the dressing.

That is all you need to know about tying Flies for King Salmon.

John Kumiski
http://www.spottedtail.com

All content in this blog, including writing and photos, copyright John Kumiski 2012. All rights are reserved.

Share
|


Effective Fishing Flies- Gartside’s Gurgler

In my last fishing report I mentioned using the late Jack Gartside’s Gurgler for seatrout with great success. I went to Jack’s website (yes, it’s still up and running, you can see it here) to see if I tied it anything remotely like Jack did. It’s modified quite a bit. I suppose that’s to be expected. Fly tyers always modify stuff to fit their own needs.

You tie these in the sizes and colors you need to match what your intended target is. For the seatrout I tie it as below, in white. I tie it on a #4 Gamakatsu SC-15 for baby tarpon. I use it in Alaska as tied below, but in pink, for silver salmon and on a #6 long shank hook in orange for Dolly varden. I tie little ones for bluegills. It’s a wonderfully versatile pattern.

Here’s how I tie it. Fishing instructions are below.

Gartside gurgler fly

What a finished gurgler looks like. Note the double layer of foam at the front.

Hook- Mustad 34011, size 2

Thread- flat waxed nylon

Tail- short piece of calftail, marabou, or Arctic fox

Body- Estaz or similar material

“Shell”- craft foam cut to about a 1/4-3/8th inch width.

1) Start the thread and wind back to hook bend. Tie in the tail. I find a short tail fouls much less frequently than a long one.

2) Tie in the Estaz, same spot.

3) Take the strip of craft foam and your scissors and taper the end to a “V.” Tie in the point of the V such that the strip extends out over the tail.

4) Wrap the thread up to a point about 1/4 inch behind the eye of the hook. Wrap the Estaz to that point. Tie it off and cut it.

5) Fold the foam over and tie it off at the same point.

6) Fold the foam back on itself and tie it off again, at the same point. The foam is now two layers thick. Drop the bobbin and use the scissors to cut the foam off 1/4 inch behind where you tied it off. The doubled foam increases the fly’s buoyancy, and makes it somewhat more durable.

7) Whip the head, then cement it.

When fishing for seatrout I try to make the fly pop and spit water. It does not make the commotion a popper will but it seems to make quite enough for the trout.

spotted seatrout caught on a gurgler.

Spotted seatrout caught on a gurgler. They seem to like it quite a bit, and it’s easy to make.

In Alaska when fishing silvers I fish it the same way.

For dollies cast it quartering downstream and give it little pops as it swings. There is no more enjoyable way of catching them.

Please let me know how it works for you.

John Kumiski
http://www.spottedtail.com


All content in this blog, including writing and photos, copyright John Kumiski 2012. All rights are reserved.


Share
|


Tying the Hot Head Fly

Everyone loves a new fly pattern. The hot, new pattern is the Hot Head! It’s sure to become a classic for everything that swims.

An assortment of Hot Head flies, tied by your intrepid blogger.

With the hyperbole out of the way, it is a good looking fly. Marcia Foosaner has been using them around Stuart and has been catching seatrout, jacks, bluefish, snook, and other stuff with it. Jacks and bluefish will hit an acorn. Trout and snook are a little more discriminating.

The Hot Head requires the use of a Hot Head, a cup-like soft plastic head from DOA, designed to be used with their lines of shad tails and jerk baits. Marcia and I have found a fly tying use for it that makes tying a handsome baitfish imitation quite simple.

Here’s how I tie the Hot Head. Feel free to modify, and please feel free to share your successes.

Materials
Hook- Gamakatsu SC-15, size 2/0
Tail- three pairs of hackle feathers
Flash- small amount of pearl colored Wing ‘n’ Flash
Cheeks- one complementary/contrasting pair of marabou feathers
Collar- one red hackle feather wrapped around the hook
Head- DOA Hot Head

1. With hook in vise, wrap thread to bend of hook.

2. Match three pairs of hackle feathers. Tie them in at bend.

3. Take a small amount of Wing ‘n’ Flash and tie it in just in front of the hackle feathers. It should trail back past the tips of the hackles.

4. Tie in one marabou feather tip on each side of the hook, just in front of the Wing ‘n’ Flash.

5. Tie in the butt of the red hackle feather in front of the marabou and take four or five wraps around the hook shank. Tie it off.

6. Take a 6″ piece of medium chenille (if you want a slow sinking fly) or a six inch piece of medium lead wire (if you want it to sink faster) and tie it in in front of the hackle feathers. Build up a big head onto which you will slide the Hot Head. Tie it off and whip finish the head.

I have tried using Zap a Dap a Goo to cement the Hot Head into place but it doesn’t hold. I will be trying other adhesives, or may conclude that cementing it into place is unnecessary. It occurs to me as I type this that if the Hot Head isn’t glued on you can change colors instantly while fishing.

7. Use a hook point of bodkin and poke a hole in the front center of the Hot Head. Slide it onto the hook over the eye.

Voila! Your Hot Head is ready to fish. Boa sorte! Three languages on one line!

John Kumiski
http://www.spottedtail.com/

All content in this blog, including writing and photos, copyright John Kumiski 2011. All rights are reserved.

Share
|


Tying the Bunny Booger

Readers familiar with my writings frequently come across references to the Bunny Booger. Some readers write to me wanting to know what it is. Others want to know how to make one. This piece will answer those queries.

A bunny booger is an artificial fly. It’s evolved from a wooly booger, and uses only rabbit fur zonker strips, available at any fly shop or store that sells fly tying supplies. I’m sure other folks tie similar flies and have other names for them.

While here in Florida I mostly use black boogers for reds and black drum, in Alaska we use cerise colored ones for salmon. Exactly the same fly except for color.

I’m sure in brown it would be a more than passable crayfish imitation for bass fishermen.

Materials
– Mustad 3407 #2 or equivalent
-1/50th oz. lead dumbell eye
-bunny zonker strip, color your choice
-danville flat waxed nylon thread

1. Start the thread and tie on the lead eye behind the hook eye. If you intend to tie in a weed guard (recommended) put it back a little farther than you would otherwise.

2. Wind the thread to the bend of the hook. Take a 1″ long piece of bunny strip and tie it in as a tail, fur side down.

3. Take a 4-6″ long bunny strip and, right where you tied the tail in, tie it in like you’d tie in a pair of hackle you intended to Palmer. It should be at right angles to the hook shank, facing away from you, with the fur side up. Wrap the thread up to the lead eye, then Palmer the bunny strip up to the lead eye and tie it off.

4. At this point you either tie in a weed guard and then finish the fly, or just whip finish and cement it right now.

It’s PDS (pretty darned simple) and takes about 5 minutes.

John Kumiski
http://www.spottedtail.com/

All content in this blog, including writing and photos, copyright John Kumiski 2011. All rights are reserved.

Share
|