Black Drum Images- A Pictorial

Black Drum.

Thanksgiving blessings to all. The holiday lies a few hours off. To central Florida fly fishers that should mean black drum begin appearing on shallow flats of the Banana River Lagoon.

We sight fish for these brutes, using seven-weight (some folks like more rod) fly rods with such flies as black Clouser Minnows, black bunny leeches, or Merkin crabs in brown. My preference is for size two hooks. a 1/5oth ounce lead eye. Weed guards are essential.

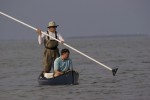
First you search for the fish. There are no guarantees you will find them. Sometimes it’s a long day, lots of water covered, nothing to show for it.

black drum

Searching for black drum in the Banana River Lagoon.

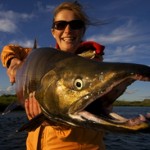
Sometimes, though, you hit the jackpot.

black drum image

John Thompson with a big black drum.

The best days for them are warm and sunny with little or no wind.

black drum image

The first time Barry Kent fished with me he got this black drum.

The water is cold though. You need waders unless you’re tough.

black drum

Greg Ritland fights a black drum.

Many moons ago I brought one of my students, a seventh grader, fishing there. He had a brand new fly rod. This is the first fish he caught with it.

black drum image

Matt Van Pelt broke in his new fly rod with this fish. He’s in his thirties now.

No one will mistake these fish for a bonefish or a rainbow trout. But they are probably the largest tailing fish in North America, reaching sizes over 100 pounds.

black drum image

It’s a face only a fisherman could love,

My good friend Rodney Smith and I had a banner day on drum one time.

black drum

Rodney Smith, when he had time to go fishing.

Another good friend, Rick DePaiva, has had more luck there than anyone else I know.

black drum image

Ricky D with one of the many big black drum he’s taken there.


black drum

This was the first fish we saw this particular morning.


black drum

We photographed the daylights out of this fish, taking advantage of a good fish and great light.


black drum release

We took several more fish this day, but this was the best one.


Black drum should be on the flats until about Easter time. Make some time to get out there and pursue these unusual fish.


John Kumiski
http://www.spottedtail.com

All content in this blog, including writing and photos, copyright John Kumiski 2012. All rights are reserved.

Share
|


Keep Your Expensive Gear Dry!

Boats float on water. Water in general and saltwater in particular ruins our stuff, especially stuff like sandwiches, cell phones, and cameras. If your sandwich gets soggy you’re out a lunch, but if your phone or camera gets wet you’re out a hundred or more dollars and perhaps an important safety device. Keeping things dry aboard any boat, and especially a small boat like a canoe or kayak, is not just an academic exercise. It’s important.

You’ll find a variety of things to keep your belongings dry, particularly if you use some imagination, and what you choose will depend on your budget, your boat, what you need to keep dry, and how long you intend to stay out. Just to keep this piece manageable, we’ll only discuss day trips here. Camping trips, especially long ones, require a separate treatment.

We can divide portable dry storage containers into three main categories: waterproof bags, waterproof boxes, and waterproof packs. The easiest bag to use is any kind of plain plastic bag. The main advantage to these is they’re cheap and readily available. Their main disadvantage is a simple one. They don’t work very well. Water has soaked things I’ve had in ziplock bags many times. They’re not to be trusted except to keep minor splashes off of things.

A proper waterproof bag is a rubberized cloth or heavy plastic sack with some combination of a folding top and snaps or straps. You put your items in the bag, fold the top over two or three times, and strap or snap it down. These bags come in various sizes and they work well. I imagine if the bag was completely submerged they would leak, but I’ve used them for years in all kinds of boats without a problem. They take the shape (more or less) of the items inside and the space they’re given, and are a good choice for any small boat applications.

Waterproof boxes also work well, and are fairly inexpensive. The classic waterproof box is similar to an ammo box, except the waterproof boxes are made of plastic and usually have a gasket to seal the water out. A cam-action latch closes the box firmly. These boxes are fairly small but easily fit items like car keys, wallet, phone, and a small point and shoot camera.

A cooler is a type of box, but is only moderately good as a dry box. When it rains, coolers get water in them, and your stuff gets wet. A small, six-pack sized zip-top soft cooler may work well if you give an added layer of plastic like a ziplock bag. If this combo gets dunked though, it may fail to keep your belongings dry.

If you have larger items you might consider a bucket with a snap-on lid. For years I have used a bucket picked up at a Dunkin Donuts store to carry my cameras, sometimes several thousand dollars worth, on all kinds of boats. It was a very good investment, not too stylish perhaps, but very functional. It doesn’t fit well in a lot of places, though.

Most photographers use a specialized camera box called a Pelican Case to carry their equipment. Pelican Cases are professional devices and work exactly as they are supposed to. Their only disadvantages are the initial expense, and they are a little pricey, and the fact that they look and carry something like a briefcase. You can’t carry a Pelican Case and fish at the same time. But you could back your pickup truck over one and your cameras would still be fine.

If you fish out of a boat and like to wade, carrying a camera with you and keeping it dry becomes a problem. The Dry Creek Backpack from Simms solves it. This excellent piece of equipment is the size and shape of a standard daypack, and has the daypack’s shoulder straps so you can carry it on your back, but has the material and tie down straps and snaps of a waterproof bag. You can put whatever you want in this pack, and even if you fall down in the water your stuff will stay dry. As with all of Simms products it’s made to the highest quality standards and will last for years. You can see the Dry Creek Backpack at www.simmsfishing.com.

The fact is, most of us need and will use a variety of the methods used here. If you spend much time around the water in small boats, it can’t be helped.

John Kumiski
http://www.spottedtail.com 

All content in this blog, including writing and photos, copyright John Kumiski 2011. All rights are reserved.

Share
|


Related articles

Thirteen Tips for Better Fishing Photography

Thirteen Tips for Better Fishing Photography

The question frequently comes at me, “What kind of camera do you use?” Here’s the answer, and some Thirteen Tips for Better Fishing Photography.

I carry two Canon Rebel XTi bodies (no longer made). One is fixed with a wide angle Tokina 10-17 mm zoom lens, an awesome piece of equipment. The other carries a telephoto Canon 70-300 mm zoom lens, likewise simply awesome. I also carry a Canon 18-55 mm lens in my camera bag.

My camera bag is a Simms Dry Creek backpack. It’s lined with pieces of an Ensolite sleeping pad cut to fit the pack. The cameras and lenses are wrapped in towels for protection. While walking or wade fishing the cameras can stay dry on my back, quickly available if an opportunity comes up.

Here come the tips. Once you understand what’s happening inside those little black boxes feel free to break these rules.

1a. Set the ISO on the wide angle lens body to 100, and don’t shoot at a shutter speed less than 1/60th of a second.

1b. Set the ISO on the telephoto lens body at 400, and don’t shoot slower than 1/300th second.

2. Keep the lenses and the camera sensors clean. A blower brush, a package of lens tissue, and a small bottle of lens cleaner are the minimum maintenance requirements.

3. Fill the frame with the subject.

Rick’s interesting face certainly fills the frame.

4. Pay attention to the light- direction and quality. Fish and many other things photograph best when the sun is low in the sky.

A late afternoon sun illuminated this scene.

5. Take pictures of people fishing, not just grip and grins. Don’t forget release shots.

The caster provides a focal point in this moody scene.

6. Take close-ups of tackle and lures, not just people.

This close up of mouse flies shows their details.

7. Take close-ups of caught fish. Don’t ignore parts that don’t have eyes.

8. Focus on eyes of whatever it is you’re photographing if they’re in the frame. See the chum salmon, above.

9. Take LOTS of pictures when you get a good opportunity. Often one of 20 or 30 is clearly the best.

10. When taking grip and grins, have the gripper howl (or some other stupid thing). Sometimes the howling makes the photo. Sometimes the laughter that follows does.

After I had him howl Andrew cracked up laughing. That’s when I got the shot.

11. Delete any photos that aren’t good. No one wants to go through 95 crappy shots to see the five good ones.

12. Fish can’t breathe when they’re not in the water. If you intend to release the fish do not beat it up!

13. Subjects wearing red or yellow will photograph better than any other color.

If you have other tips not mentioned here (and there are plenty), please feel free to share them with us!

John Kumiski
http://www.spottedtail.com

All content in this blog, including writing and photos, copyright John Kumiski 2011. All rights are reserved.

Share
|


Thirteen Lucky Tips for Improving Your Fishing Photography

Thirteen Lucky Tips for Improving Your Fishing Photography

The question frequently comes at me, especially while giving slide shows, “What kind of camera do you use?” These Thirteen Lucky Tips for Improving Your Fishing Photography answers the question, and gives some tips on how to use the stuff besides.

I carry two Canon Rebel XTi bodies. One is fixed with a wide angle Canon 10-22 mm zoom lens, an awesome piece of equipment, used for things I can get close to.

orlando fishing trip

The wide angle lens adds a new twist to the grip and grin!

The other carries a telephoto Canon 70-300 mm zoom lens, likewise simply awesome. Use this for things that are farther away.

orlando fishing guide

The telephoto works well for wildlife…

…and also works well for informal portraits.

I also carry a Canon 18-55 mm zoom lens in my camera bag, mostly for close-up work.

My camera bag is a Simms Dry Creek backpack. It’s lined with pieces of an Ensolite sleeping pad cut to fit the pack. The cameras and lenses are wrapped in towels for protection. While walking or wade fishing the cameras can stay dry on my back, quickly available if an opportunity comes up. I’ve done this for four years now and the pack gives plenty of protection.

Here come the tips. Once you understand what’s happening inside those little black boxes feel free to break these rules.

1a. Set the ISO on the wide angle lens body to 100, and don’t shoot at a shutter speed less than 1/60th of a second.

1b. Set the ISO on the telephoto lens at 400, and don’t shoot slower than 1/300th second.

2. Keep the lenses and the camera sensors clean. A blower brush, a package of lens tissue, and a small bottle of lens cleaner are the minimum maintenance requirements.

3. Regardless of which lens you use, try to fill the frame with the subject.

Fill the frame with the subject. The wide angle lens was used for this shot.

4. Pay attention to the light- direction and quality. Fish and many other things photograph best when the sun is low in the sky. Human faces also photograph well when light is diffuse, such as with high overcast.

Late afternoon light gives beautiful color.

5. Take pictures of people fishing, not just grip and grins. Don’t forget release shots.

Take shots of people fishing.

Take shots of people NOT fishing.

Don’t forget release shots!

6. Take close-ups of tackle and lures, not just people.

DOA Shrimp

Get shots of tackle and lures.

7. Take close-ups of caught fish. Don’t ignore parts that don’t have eyes.

Fish picture- no eyes!

But eyes are OK, too.

8. Focus on eyes of whatever it is you’re photographing if they’re in the frame.

9. Take LOTS of pictures when you get a good opportunity. Usually, one of 20 or 30 is clearly the best.

10. When taking grip and grins, have the gripper howl (or some other stupid thing). Sometimes the howling makes the photo. Sometimes the laughter that follows does.

I told Andrew to scream. When he finished he cracked up laughing.

11. Delete any photos that aren’t good. No one wants to go through 95 crappy shots to see the five good ones.

12. Fish can’t breathe when they’re not in the water. If you intend to release the fish do not beat it up!

13. Subjects wearing red or yellow will photograph better than any other color.

If you have other tips not mentioned here (and there are plenty), please feel free to share them with us!

All content in this blog, including writing and photos, copyright John Kumiski 2010. All rights are reserved.