A Review of The Old Town Penobscot 174

A Review of The Old Town Penobscot 174

Old Town Penobscot review

We hear and see so much about kayaks and kayak fishing these days. Undeniably, kayaks have certain advantages- they’re small, they’re very portable, and when you’re in a solo kayak there is no compromise. You can do exactly what you want, whenever you want to do it.

Canoes seem to have been left behind in all this. This really is too bad, because canoes have some advantages, too. You can stand up sometimes, to rest your butt and get a better view of the water than if you were sitting. While a bit larger than a kayak, canoes are still very portable. And they have one huge advantage over a kayak when it comes to long trips- they have a much larger load capacity.

Another advantage of the canoe if you’re a shallow water fisherman is that you can stand and pole it. I spent quite a bit of time on the trip described below standing and poling the vessel with a ferruled two-piece 14 foot Moonlighter push pole. It works wonderfully well!

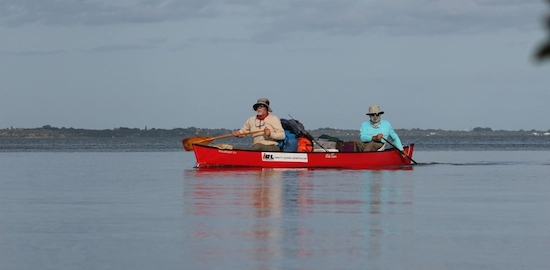
Five of us just made a 160-mile paddle along the full length of Florida’s Indian River Lagoon. Three of the participants were in canoes. Two were in kayaks. Before the trip started I wondered how the kayakers would carry all the gear they needed for a trip of that length.

It didn’t take me long to find out. They kayakers lived on freeze-dried food, ramen noodles, cookies, and cliff bars. The canoeists ate real food- apples and oranges, fresh vegetables, cookies (of course!), and cooked our real food on stoves, double burner Colemans. We shared our food with the kayakers, of course.

My friend Rodney Smith and I were in an Old Town Penobscot 174. We pushed it along with paddles made by Bending Branches. I expected to be lagging behind the other paddlers but was pleasantly surprised to discover we could out-paddle every other boat on the trip with the exception of Mim’s Epic kayak, a superbly designed little vessel built for speed.

old town penobcot review

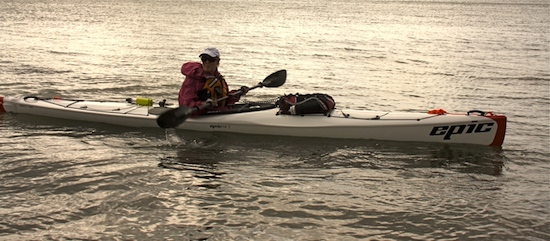
Mim’s Epic is a fast little boat.

No way could Mim’s Epic carry a load like we had.

The Penobscot was, shall we say, heavily loaded. It’s rated for a 1500 pound capacity. I believe it would handle that load easily. Throughout our trip it paddled and handled like a dream.

Indian River Lagoon Paddle Adventure

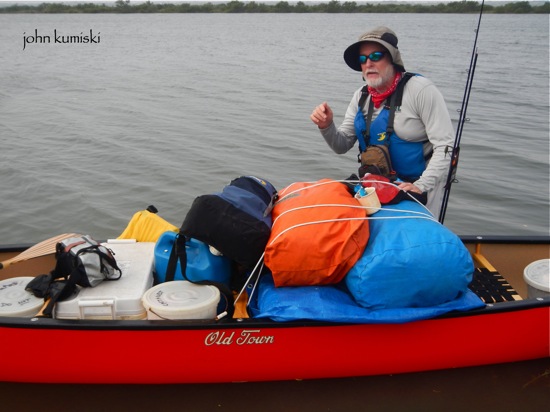
We had too much stuff. We made it work.

Old Town builds this boat in a Royalex version and a polypropelene version. To the casual observer they are identical. The Royalex boat weighs 65 pounds, the poly vessel 83. There’s an $800 price difference, though- a hefty $50 a pound.

If frequent portages were a consideration, the extra money would be well spent.

Here in Florida I’d use the difference to get good paddles- the already mentioned Bending Branches. In the stern I used a Sunburst ST. I’ve been paddling a long time and have used a lot of different paddles. This is the best ever. In the bow Rodney used a vintage Bending Branches bent shaft paddle that he likewise said was the best one he had ever used.

old town penobcot review

The Bending Branches Sunburst ST taking a break along the Indian River Lagoon.

Both of us were extremely pleased with both the boat and the paddles. If we were to do it again, we would do it exactly the same way. The boat and the paddles are made for each other.

So ends a review of the Old Town Penobscot 174 and the Bending Branches Sunburst ST.

John Kumiski
www.spottedtail.com

All content in this blog, including writing and photos, copyright John Kumiski 2014. All rights are reserved.

Share |


Selecting Successful Seatrout Flies

Selecting Successful Seatrout Flies

selecting successful seatrout flies

“What has been will be again, what has been done will be done again; there is nothing new under the sun.” -Ecclesiastes 1.9

More fishermen fish for seatrout than any other inshore gamefish along the coasts of the southeastern United States. You would think that reams of information would be available on selecting successful seatrout flies. Not so.

Here in Florida the average seatrout weighs between one and three pounds, so they’re not very big. They’re fairly easy to catch most of the time. They don’t fight very hard. And they’re usually hard to sight fish. So most serious fly fishers look for other species.

Challenging Targets

A seatrout over five or six pounds is a difficult fish to fool. They can be sight fished, best during the winter but also while they’re spawning. They are as spooky as any creature with fins. A seatrout over five pounds that is sight fished and caught on a fly rod is a great trophy.

The smaller ones are fun and will save the day when more appealing species aren’t biting. The larger ones present a formidable target in their own right.

Eyes Bigger Than Stomach?

A seatrout of any size is a glutton. A big seatrout will take a very large bait.

While poling one time I spotted what I thought was a dead fish lying on the bottom. I went over to investigate and was heartbroken to see it was quite a large seatrout, belly up. I poked it gently with the push pole and was surprised to see it wiggle weakly. I said to my fisherman, “It’s not dead! Reach down and pick it up.” He did, and we put it on a Boga Grip. It weighed a whopping nine pounds. Not many fly casters can say they’ve caught a nine pound seatrout with their bare hands!

I started examining the fish. It was pretty beat up. I looked down into its mouth. There was the tail of a one to two pound mullet sticking out of the fish’s throat. If a big seatrout will take a mullet this size they’ll also take a large fly.

Smaller seatrout seem to prefer shrimp. While larger fish will certainly eat them, they usually fill up by eating baitfish, principally by ambush feeding. Mullet, menhaden, pigfish, pinfish, pilchards, etc., all help big seatrout stay fat and healthy. So your best bet with seatrout flies, if you prefer the larger fish, is to stick with baitfish patterns.

Color, Flash, Sound

Bright colors and flash seem to attract the eye of big trout. Red and yellow, red and white, chartreuse and white, all seem to work well. Fluorescent and even luminescent colors are frequently outstanding. But I’ve also had good success with realistic color combinations, and drab colors like black, gray, brown, and grizzly, especially when sight fishing for them.

You can find trout in various depths of water. For shallow water fish (about fifteen inches deep or less), and these are almost always big ones, you need a fly that kisses the water when it touches down. The small “Plop!” of a lead eye spooks them badly in this situation.

For fish in deeper water, noise seems to be a great attractor. Flies that incorporate rattles can be extremely effective. Those luminescent materials can greatly add to the effectiveness of deep water patterns, too.

To read the rest of this article, visit this link…

John Kumiski
http://www.spottedtail.com

All content in this blog, including writing and photos, copyright John Kumiski 2013. All rights are reserved.

Share |


Fly Fish Banana River Black Drum

Fly Fish Banana River Black Drum

It’s getting to be that time of year!

Fly Fish Banana River Black Drum

Black drum run big. If you Fly Fish Banana River Black Drum they’ll probably be the largest tailing fish to which you’ll ever cast a fly.

When you’re in the water up to your hips and that broom-sized tail pops up, I don’t care where you’ve been or what you’ve caught. Adrenaline is going to rush. The mouth will dry right up. It’s exciting fishing.

The requisite fly selection for black drum is small. Flies need to sink like an anvil. A black, size 2 Clouser Minnow with a weedguard or a dark crab pattern such as a Merkin are the best choices.

You need a seven- or eight-weight outfit with a floating line, plenty of backing, and a 10 foot leader with a 15 pound tippet, almost impossible to break.

Paddle up into the Banana River Lagoon’s federal manatee refuge (locally called the no motor zone) searching for them. Either a canoe or a kayak will work. Use the boat to find the fish, then wade.

The best weather is a cool, sunny day with a light north or northwest wind. The best time of year runs roughly from Thanksgiving to Easter.

You won’t find them on the shoreline. Look out on the deeper part of the flat, even at or off its edge. Expect that some days you won’t see any.

While tailers are what everyone wants to see, drum don’t always tail. Many times you’ll see cruising fish. They will still take a well presented fly.

Sometimes you find the drum as scattered singles. If you’re lucky, you’ll find a herd. Anytime you find some, be happy about it. Make the best of whatever situation comes along.

How far will you have to paddle? Some days only a few miles gets the job done. Other days you might have to go all the way up to the NASA Causeway, a round trip of more than 10 miles.

To read the rest of this article, visit this link…

Life is short. Go Fishing!

John Kumiski
http://www.spottedtail.com

All content in this blog, including writing and photos, copyright John Kumiski 2013. All rights are reserved.

Share
|


The First Annual Spotted Tail Christmas Giving Guide

The First Annual Spotted Tail Christmas Giving Guide


My idea of Christmas shopping is googling what I want and then paying for it with a credit card or paypal.  So The First Annual Spotted Tail Christmas Giving Guide will have lots of links.

A fishing trip with Capt. John Kumiski makes a spectacular gift, and yes, we supply gift certificates. Or you may prefer a gift certificate to one of our popular fishing seminars.

For the well-read fisherman, books by Capt. John Kumiski are a thoughtful gift that will keep on giving. They are on sale until Christmas, too. I will even sign them!

For the fisherman with a camera, a lens cleaning kit is very useful. For dSLRs a sensor cleaning kit will make all those ugly spots go away.

For the fisherman without a camera, the Nikon AW-100 is waterproof to 30 feet and makes excellent images for a point-and-shoot. It also has video capabilities.

What paddling fisherman couldn’t use a nicer paddle? Bending Branches makes some of the nicest paddles around.

If the fisherman on your list likes to eat fish, he may have to clean one once in a while. A nice filet knife and the best way to keep it sharp will be useful for a long time. A Kevlar glove makes fish cleaning chores much safer.

Going to a tackle store and buying a bunch of stuff for your fisherman is not a good idea. Going into his tackle box, writing down the names of several items he has in there, and buying some of those on-line is an excellent idea.

Accessories make the fisherman. All fisherman need pliers, nippers, and clamps. Dr. Slick makes the nicest ones available.

A dehooker is an always-useful tool for the fisherman, too.

Any outdoorsman needs a way to carry water. The Vapur flexible one-liter Element bottle folds up once empty.

Christmas happens during the winter. Your fisherman might need to stay warm and dry. Raingear from Simms is always in excellent taste. They make a complete line of clothing for the fisherman, too, not just rainwear.

Glacier Gloves, made from neoprene, keep the hands going even when it’s cold and wet.

Many outdoorsmen find coffee an indispensible part of their morning. Stanley’s vacuum bottle carries the goods better than anything else.

Outdoorsmen also need sun protection.

The Tilley Hat is the finest headgear I have ever used and it looks good besides.

The Buff is all the rage with flats fishers nowadays, with good reason. Who needs skin cancer?

And for those skin areas not under cover of the Tilley or the Buff, Smartshield sunblock is my favorite- non-greasy, non-pasty, and extremely effective.

So with a wide range of prices, every outdoorsman on your list will find something useful in the First Annual Spotted Tail Christmas Giving Guide.

Have the merriest of Christmases!

John Kumiski
www.spottedtail.com

All content in this blog, including writing and photos, copyright John Kumiski 2013. All rights are reserved.

Share
|


Packing for a Florida Canoe Trip- The Fly Box

Aerial view of Indian River Lagoon

Aerial view of Indian River Lagoon (Photo credit: Wikipedia)

Packing for a Florida Canoe Trip- The Fly Box

The path of the Indian River Lagoon Paddle Adventure takes it the length of the most biologically diverse estuary in North America, the Indian River Lagoon system. This blog discusses Packing for a Florida Canoe Trip- The Fly Box. The conventional tackle box was covered in a separate blog.

We will find many species of fish. I want to keep track of how many different kinds we can catch. Redfish, snook, seatrout, snapper, moonfish, jacks, it’s a long list. Since it’s a paddle trip, you don’t have room to bring a ton of tackle. I hope the list below is an exercise in minimalism.

The fish we’ll be encountering eat three things for the most part- smaller fish, shrimp, and crabs. The flies carried should reflect this. Additionally, some attractor-style flies like spoonflies and poppers should be carried, too.

My rod will be a six-weight outfit with a floating line. It’s too small for big tarpon but I don’t anticipate many of those in December. It’s more than adequate for everything else we’re likely to run into.

The rest of my fly tackle all fits into a single Simms Dry Creek Waist Pack . In the pocket of the pack we find the following items:

– a couple of finger guards

– a Dr. Slick hook file 

– a stick of sunscreen for the lips.

Inside the pack will be the following:

-fluorocarbon leader wheels in 12, 15, 20, and 30 pound test

– a package of Knot 2 Kinky leader wire . You never know when this might be needed

– a dehooker

– a Gerber Multitool

– a small bag with a half dozen small white shrimp flies for nighttime dock fishing. I don’t know that we’ll do any dock fishing but if we get a chance I will be ready.

– a one quart ziplock back containg a couple dozen synthetic minnow fly patterns, similar to Puglisi style flies, in sizes from #4 to #2/0, many with weedguards, some tied as bendbacks.

redfish flies

On top a Deceiver. The other two are synthetic minnow patters.


There will be some Hotheads in there as well.

An assortment of Hot Head flies, tied by your intrepid blogger.

An assortment of Hot Head flies, tied by your intrepid blogger.

– a small Plano box jammed with flies, including-

*3 Dupre spoonflies

Jim Dupre's Spoonfly.

Jim Dupre’s Spoonfly.

* a half dozen Merkin crabs, size #4, with weedguards

A gaggle of Merkins.

A gaggle of Merkins.

*several Clouser Minnows in various colors and sizes (#4-1), with weedguards

packing for a florida canoe trip

A Clouser Minnow selection.

*several black bunny leeches, #2, with weedguards

The bunny leech or bunny booger, a deadly fly.

The bunny leech or bunny booger, a deadly fly.

*several of each Son of Clouser and Mosquito Lagoon Specials, size #4

the Mosquito Lagoon Special

the Mosquito Lagoon Special

* several Borski-style Sliders, size #4, in various colors and weights, with weedguards

port canaveral and mosquito lagoon fishing report

A Slider as tied by me.

* a few Trout Bites (a hot pink and chartreuse bucktail bendback), size #4

The Trout Bite on top, and a synthetic minnow below.

The Trout Bite on top, and a synthetic minnow below.

* a few Rattle Rousers, size #4

Rattle Rousers, weighted and not.

Rattle Rousers, weighted and not.

* a selection of poppers and gurglers

My version of Gartside's Gurgler.

My version of Gartside’s Gurgler.

With this kit, even if we were paddling to Key West (don’t get any ideas, Rodney) I would be prepared for most of what we would encounter.

So we have discussed Packing for a Florida Canoe Trip- The Fly Box. If you were coming along, what would you bring?

John Kumiski
www.spottedtail.com

All content in this blog, including writing and photos, copyright John Kumiski 2013. All rights are reserved.

Share
|

First Aid Kits for Paddlers

First Aid Kits for Paddlers

A Guest Blog by Kristen Beck

If you intend to paddle along on the Indian River Lagoon Paddle Adventure, you must consider first aid kits. You need to think about your safety and rescues. If you are out paddling you are in the wilderness, even on the Indian River Lagoon. In general it takes one hour for every quarter mile you are away from a trail head, boat landing, or somewhere that an emergency vehicle could meet you, to get an injured party back. It could take longer depending on mode of injury or degree of incapacitation. I highly recommend that you take a first aid and safety course. A wilderness first aid course is excellent but a basic course is better than nothing.

A good first aid kit doesn’t need to break the bank. Put together a dedicated kit that becomes part of the essential gear that you never leave without- paddle, life jacket, first aid kit- you need them all. If you have it you might not ever need it, but that one incident when you need it and don’t have it will suck, so pack it!

Here are some tips on how to make your own first aid kit for the wilderness. You may want to increase the amount of supplies depending on how many will be traveling with you. Encourage your paddle buddies to carry their own kits.

Storage

You will want something lightweight and waterproof. Ziploc bags are great for keeping items clean and organized, but they are NOT waterproof. Invest in a dry bag and mark it with a huge red cross, so anyone will recognize it as a first aid kit. Dry boxes are good but I find a medium size dry bag works best.

Size

How big of a first aid kit you create depends on a few things. Is it just for you or for a group traveling together? Are you simply hiking and camping or will you be partaking in other adventurous activities like rock climbing or rafting? If so, you may want a larger first aid kit as serious injuries need more attention.

What to Pack

Here is a suggested list. You can always add or subtract items depending on your personal needs.

Basic components:

  • Small gauze pads
  • Large gauze pads
  • Hand sanitizer
  • At least 2” gauze roll – 1 or 2 rolls
  • Triple antibiotic ointment
  • Povidone/iodine solution
  • Chemical heat and cold packs
  • Baby wipes
  • Scissors
  • Tweezers
  • Latex gloves
  • Hydrogen peroxide bottle
  • Bottle of clean water
  • Maxi pads – 3 or 4
  • Emergency space blanket
  • Clean trash bags, 3 or 4, can be used as poncho, shelter, and to retain body heat
  • Duck tape – 1 full roll, replace as you use it. DO NOT waste your money on water proof bandages. They do not stay when wet, and paddling is a wet sport
  • Waterproof tape

Medications

  • Antacid
  • Antihistamine (Benadryl, etc.); allergic reactions, insomnia
  • Anti-inflammatory (Ibuprofen, Acetaminophen); inflammation, pain
  • Hydrocortisone cream (soothes allergic skin)
  • Potable Aqua (iodine water treatment)

Make sure your kit is accessible!!! Do not pack in the very rear hatch buried under everything. I like to have mine visible in a day hatch or on the deck where I can get to it quickly. If you are ashore taking a hike take it with you. That is when you will most likely need it.

Be sure to inspect your kit often, preferably before every trip. Make sure the gear is clean and supplies are in good condition. Replace expired medications as needed and add items that would have been helpful on your previous trip Also be sure to tell others you are traveling with where your first aid kit is, in case you are incapacitated. Encourage your friends to take a first aid and safety course.

If you aren’t comfortable making your own fist aid kid, pre-packaged kits are available online for purchase.

Tell people where you are going, when you are leaving and when you expect to be back. Take a cell phone with you- you can turn it off so you don’t disturb the wilderness setting but will have it if you need it. Most paddling locations here in the area you will get some coverage but you may have to move around. Have the appropriate numbers programmed into your phone; know where you are- when you call for help you need to be able to give the 911 operator your location.

Be prepared and you will have a better outdoor experience!

Kristen Beck, Director
A Florida Outdoor Center- Connecting people with nature thru outdoor activities and bringing nature in to those who can not get out.
www.AFLOC.org
772-202-0220
facebook at www.facebook.com/kayakkristen

All content in this blog, including writing and photos, copyright John Kumiski 2013. All rights are reserved.

Share
|

How to Pack for a Florida Canoe Trip- The Tackle Box

How to Pack for a Florida Canoe Trip- The Tackle Box

The path of the Indian River Lagoon Paddle Adventure takes it the length of the most biologically diverse estuary in North America, the Indian River Lagoon system. This blog discusses How to Pack for a Florida Canoe Trip- The Tackle Box. The Fly Box will be covered in a separate blog.

We will find many species of fish. I want to keep track of how many different kinds we can catch. Redfish, snook, seatrout, snapper, moonfish, jacks, it’s a long list. Since it’s a paddle trip, you don’t have room to bring a ton of tackle. I hope the list below is an exercise in minimalism.

The spin rod I’m bringing will be a two piece, 6.5 foot light action rod with a Shimano Spheros 3000. On the reel will be Power Pro 10 or 15 pound braid. Most of the time there will be a section of twenty pound fluorocarbon on the business end.

A small box of lures is joining me. In the box are the following:

-three 1/8th ounce weedless jigheads and 10 matching soft plastic tails;

-three shallow running DOA Bait Busters;

-one dozen three inch DOA Shrimp, assorted colors;

-two Chug Bugs with single hooks;

-two five-inch Rebel jointed swimming plugs (couldn’t find a link for these) with single hooks*;

-two 1/4 ounce Johnson Minnows;

-about one dozen DOA CAL jigheads, 1/16th to 1/4 ounce;

-a 12-pack of Woodies Rattlers plastic worm rattles;

-a bag of 00 size split shots and a few DOA pinch weights.

*We drag a Rebel behind the boat as we paddle. If you stop paddling the plug floats instead of snagging on the bottom. I don’t know how it will work in the lagoon but it used to work well in the Everglades.

In a one gallon Ziplock bag are:

-one package each of 3/0 and 5/0 Daiichi D65Z hooks for jerk baits;

-a package  of 5/0 Daiichi D84Z circle hooks just in case;

-a quart-size Ziplock with a handful of DOA CAL 5.5 inch jerkbaits;

-a quart-size Ziplock with a handful of DOA CAL AirHeads and the DOA  longneck hook designed for these baits;

-a quart-size Ziplock with a handful of DOA CAL  three inch shad tails;

-a quart-size Ziplock with a handful of DOA CAL four-inch jekbaits.

And we simply MUST accessorize, dahlink:

-a Dr. Slick line nipper on a cord around my neck;

-a pair of Dr. Slick bullet head pliers in a holster on my belt;

-an orange grabby glove (couldn’t find a link for these) for lipping tarpon;

-one each Seaguar fluorocarbon leader wheels in 20 and 30 pound test.

That’s my tackle kit, and I’m sticking to it.

And that is the end of Packing for a Florida Canoe Trip- The Tackle Box blog.

As always please share any questions, comments, and suggestions.

John Kumiski
www.spottedtail.com

All content in this blog, including writing and photos, copyright John Kumiski 2013. All rights are reserved.

Share
|

Related articles

How to Pack for a Florida Canoe Trip

How to Pack for a Florida Canoe Trip

With our big paddle on the Indian River Paddle Adventure coming up I thought I would share how to pack for a Florida canoe trip. There are many ways that will work. Here are a few of them.

First of all, on a long trip there’s no ice. Don’t bring anything that requires refrigeration. For example, hard cheeses hold up better than do soft ones, although if it’s hot the hard ones don’t hold up too well, either. Instead of butter, bring margarine. Instead of a stick, get it in a tub. For milk you have a choice between boxed and powdered. Eggs, both raw and boiled, go in an egg carrier. Hopefully you get the idea.

Raccoons want your food and water, so you have to pack it such that their desires are frustrated. Food not in cans or bottles goes into a hard plastic cooler . The raccoons can open one of these so you must bring enough cord that you can tie it shut.

Cans and bottles can go in a crate if cooler space is at a premium.

Store breakfast, lunch, and snack items in a five gallon plastic bucket with a snap-on lid. I got mine at doughnut shops but the square ones kitty litter comes in look like they would be even better. You will need several of these. They double as camp seats, too. Use a marker to write the contents on the lid. This will make life in the canoe less confusing.

Raccoons will chew through the water bottles that bottled water comes in. You need something more durable, something on this idea

Food going into the cooler will need to be repackaged in plastic ziplock bags. A bag of pita bread is already perfectly packaged. A box of pasta or crackers is not. At your house the pasta or crackers come out of the box and go into a bag. This way you’re not carrying trash with you, the pasta or crackers are protected from moisture, and the bag will come in handy for something else once the pasta or crackers get eaten. Do this with all your food, and stow it in the cooler (except for lunches and snacks, already mentioned). Bring extra ziplock bags!

The garlic, onions, carrots, potatoes, hard squashes, and any fresh fruit also go in the cooler.

My cook kit is in another crate like the one already mentioned.

Your clothes go in a plastic bucket like the one already mentioned. Carry a large plastic trash bag for dirty clothes. Sneak a few clothespins in your stuff someplace.

Your pillow, sleeping bag, and bulky warm clothes have to go in a waterproof bag.  Carry straps are handy.

The sleeping mats, tent, tarps, extra cord, that kind of stuff goes in a big duffel bag . It’s nice if it’s waterproof.

Personal items can be carried in small waterproof bags.

This system of How to Pack for a Florida Canoe Trip may not be the best or most elegant but it has served me well over many canoe trips. If you have comments, questions, or other suggestions please let us know about them!

John Kumiski
http://www.spottedtail.com

All content in this blog, including writing and photos, copyright John Kumiski 2013. All rights are reserved.

Share
|

Related articles

Bonefishing Crooked Island, Bahamas

Bonefishing Crooked Island, Bahamas

A Guest Blog by Michelle M. Yelton

bonefishing crooked island bahamas

Guide Shakey shows off a bonefish.

Shakey. The name, not the fly-fishing. The fishing is spot on.  Standing atop a powder white flat seasoned with a gray-toned rock bottom, Shakey points his finger with the confidence of a military sniper and commands, “ten o’clock, 30 feet, cast it now.”

To the untrained eye, even donning a pair of polarized lenses, one might think Shakey is off.  But, he couldn’t be more precise.  Hidden in clear sight is a bounty of bonefish.

To someone listening in, one might mistake Shakey for an intense gym trainer.

“Cast it again! Now, now! Go! Aww, shit, you missed it.  Dropped it too hard. Try again, man.”

It’s no wonder these stunning fish, nearly transparent and adorned with sterling silver tiger stripes, are also known as the “ghosts of the flats.” It’s the unlikely scenario where camouflage meets pristine beauty giving fly fisherman and guides the challenge of first spotting, then landing one.

But after 18 years as a fly-fishing guide on the Crooked Island of the Bahamas, make no mistake, Shakey’s eyes and judgment are not a reflection of his nickname.

Born Elton McKinney, Shakey remembers the first time he witnessed the sport of fly fishing.

“In 1994 this guy came to the island to fly fish, and I thought it was the craziest thing I’d ever seen,” Shakey recalls.  “But after watching him a while, I asked him to teach me.”

That was just the beginning.  His family thought he was foolish for spending gas money to boat around the islands looking for bonefish, but Shakey knew he discovered a gem that could profoundly impact his town’s economy.

“I told them to relax; that this was my money and my time. Knowledge is power and I just keep pushing on.” 

And he was right. Before guiding for bonefish, Shakey and his father hauled in bonefish commercially. Once Shakey realized the fish had more potential as a tourism draw, he took action to stop that practice.

“After I started guiding I told my old man, ‘We aren’t hauling no more bonefish,'” said Shakey. “And he wasn’t happy about that. Then, I went to the police and told them these fish mean more to us than the nets, and the police agreed with that.”

Shakey and his team of seven anglers guide all year round.  While prime season is October through May, the fishing is still worthwhile the entire year.  Trips can be booked through Crooked Island Lodge.

Lodging
A group of four-room bungalows that a few yards from the beach complete with restaurant, gift shop and bar make up Crooked Island Lodge. Built in the late 1960s, the rustic and serene lodge offers the only commercial lodging option on the island. Accommodations are air-conditioned and comfortably simple, yet a good night’s sleep is never a challenge with the rocking cadence of ocean waves right outside your window. Maxing out at 12 rooms, action and adventure are only found on the water. On land, it’s all about relaxation whether it is lying beachside underneath shaded hammocks or strolling the immaculate shoreline.

Activities
In addition to the excellent fly-fishing, there are a variety of incredible spots for diving, deep sea fishing, swimming and snorkeling.  Better yet, hire a guide boat or rent kayaks and head across the bay to the old, abandoned lighthouse.  While there, learn how to catch conch or spear fresh lobster, and watch in awe as the guide transforms it into a gourmet seaside meal with just a knife, some foil and a hand-built fire. For an added treat while fly-fishing, ask Shakey to make the dolphins jump.

Dining
Meals are cooked to order three times a day at Crooked Island Lodge, and lunch coolers are packed for excursions. Dinners are the highlight of the dining experience where everyone is served the same meal, which is always a surprise of freshly caught seafood. The food is divine.

Local Tips
UV tops and pants recommended to fight the daytime sunrays, especially if going out on the water.  Pack some lightweight, long-sleeved shirts and pants or bug spray to ward off the mosquitoes and sand fleas while on land.

How to Get There
Bahamas Air flies to Crooked Island early on Saturdays and Wednesdays, which requires an overnight stop in Nassau the night before. Likewise, Pineapple Air flies in early on Mondays and Fridays.  Otherwise, hire a private charter and fly straight to Crooked Island Lodge, which has its own seaside runway.  Travelers on charter boats often make pit stops at Crooked Island Lodge where they can find food, drinks and wireless Internet.  Anchor in the bay and use a dinghy to come ashore.

Learn More
To learn more about fly-fishing in Crooked Island, Bahamas, contact The Granddaddy Fly Fishing Experience at info@granddaddyflyfishing.com or 828-288-1221 or visit their website at www.granddaddyflyfishing.com.  Additional information about Crooked Island Lodge and Crooked Island, Bahamas can be found at http://crookedislandlodge.com/.

North Carolina resident Michelle Yelton works for a public relations firm. She enjoys fishing in the Bahamas.

All content in this blog, including writing and photos, copyright John Kumiski 2013. All rights are reserved.
Share
|


Redfish- Presenting the Fly

This is an excerpt from the book, Redfish on the Fly, by Capt. John Kumiski 

Redfish- Presenting the Fly

Redfish- Presenting the Fly
It was a redfish fisher’s dream, a school of at least 500 fish, swimming fast, up on top, crashing bait all around us, one of the finest sights in all of angling, and one that one doesn’t see very often in the Mosquito Lagoon. Rob Ricks was trembling with excitement. He had caught exactly one redfish on fly in his life, and badly wanted another. It was practically certain that the deed would now be done.

“Cast out in front of them, and just make it look alive,” I told him. Rob was a weak caster. When he got the fly in the water, not very far away, there was so much slack in the line that the cast was useless.

“Try it again,” I said. “Lead them, put it where they’re going and let them swim into it.” Rob tried again with the same result. And again, and again, and again. Finally the fish disappeared. We’d caught exactly none.

The moral to this story? Your casting must be second nature in order to take advantage of opportunities, especially once in a lifetime opportunities like this one was. But it’s a great segue into this section’s premise- after locating the fish, how you present the fly to them is the single most important variable in getting one to bite, much more important than what’s at the end of your leader.

The Strike Zone
When I was younger and just getting into saltwater fly fishing, I was fortunate to get a copy of the finest instructional fishing video ever made, the late Billy Pate’s Fly Fishing for Tarpon (which I recommend highly). In this video Billy explains the concept of strike zones as it relates to tarpon fishing. We’re going to revisit this concept and then relate it to presenting the fly to redfish- cruising fish, laid-up fish, and tailers.

The strike zone is an area around the fish where, if the fly is properly presented, you have a reasonable chance that the fish will take it. This area is roughly shaped like a half a football, extending with the wide part at the mouth of the fish to the apex out in front of it. Since their mouths point down, redfish prefer to feed down, but they show little hesitation in coming up for a fly unless they are heavily fished or have been disturbed by boat traffic.

Understand that the strike zone changes in size constantly though, going from non-existent to huge and back again, and occasionally even goes behind the fish. Over the years I’ve seen a few fish do about faces to take a fly. It’s rare, but it does happen. Our assumption here is that in order to get a bite, the fly must be in the strike zone.

Hopefully it’s obvious that the longer the fly is in that strike zone, the more likely the fish is to take it. This brings us to presentation angles.

Read the rest of the article here, or  buy the book!

John Kumiski
http://www.spottedtail.com

All content in this blog, including writing and photos, copyright John Kumiski 2013. All rights are reserved.